How to Integrate Smart Lights With Home Security Cameras Automatically?
Imagine your porch light turns on the moment someone walks up. At the same time, your camera starts recording. You get an alert on your phone right away.
This is not magic. It is smart home automation working for you.
Smart lights and security cameras can work together as a team. When one device senses motion, the other reacts instantly. This creates a strong layer of protection for your home.
Many homeowners want this setup but feel unsure where to start. The good news is that it is simpler than it sounds. You just need the right devices and a few basic steps.
In this guide, we will show you how to connect smart lights with your security cameras. You will learn how automation rules work and why a central hub matters.
By the end, you will know how to build a reliable automatic lighting and security system. Your home will respond to activity on its own, giving you peace of mind day and night.
In a Nutshell
- Pick one ecosystem. Choose smart lights and cameras that work within the same brand or platform. This avoids communication issues later.
- Set up a hub first. A central hub connects all your devices. It lets your lights and cameras talk to each other smoothly.
- Build simple automation rules. Start with basic triggers like motion detected, lights on. Keep your first setup easy to manage.
- Sync devices through your app. Use your smart home app to link cameras with lights. This step makes automatic responses possible.
- Test everything before you trust it. Walk near your camera and check if lights respond. Fix any issues before relying on the system daily.
- Avoid mixing incompatible brands. Devices from different ecosystems often fail to connect. Stick with compatible gear for a reliable setup.
Understanding How Smart Lights and Security Cameras Work Together
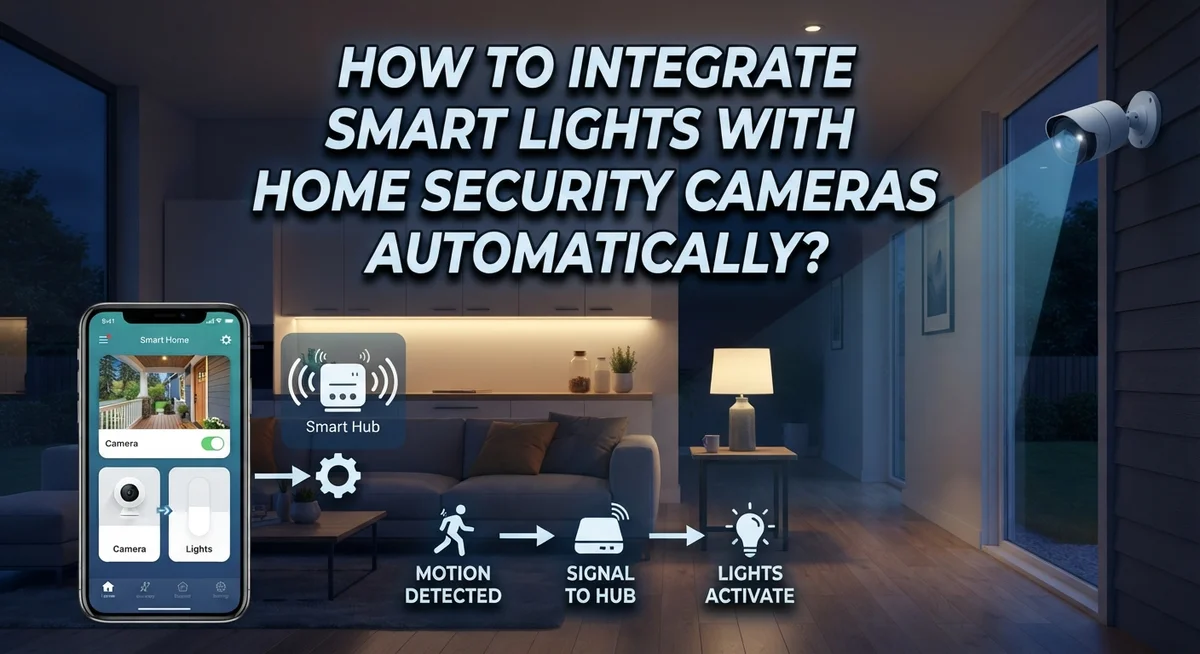
Smart lights and security cameras operate on a simple principle: they share information through a central control system. When your camera detects motion, it sends a signal to your smart home hub. The hub then tells your lights to turn on instantly.
How the connection works starts with communication protocols. Your devices speak the same language through WiFi, Bluetooth, or Zigbee standards. This shared language allows cameras to “talk” to lights without human input.
The hub acts as a translator and command center. It receives data from your camera’s motion sensor. It then executes commands you’ve programmed for your lights. Without a hub, devices struggle to communicate across different platforms.
Motion detection is the key trigger. Your camera constantly watches for movement. When it spots activity, it sends an alert to the hub. The hub immediately activates your lights based on your preset rules.
You can program different responses for different situations. Lights might turn on at full brightness during nighttime motion. They might stay dim during daytime. Your camera records video while lights illuminate the scene.
Automation rules make this hands-free. You set them once, then they run automatically. Rules work 24/7 without requiring you to press buttons. Your system responds faster than you could manually.
The beauty of this integration is reliability. Lights activate within seconds of motion detection. This creates an effective deterrent and provides better visibility for your camera’s recording.
Understanding these basics helps you avoid setup mistakes. You’ll know why device compatibility matters. You’ll appreciate why a hub is essential, not optional. This foundation prepares you for successful integration.
Choosing Compatible Devices and Ecosystems
Choosing compatible devices and ecosystems is your foundation for success. Start by picking one primary ecosystem. This means selecting smart lights and security cameras that operate on the same platform or use compatible communication standards. Devices from the same brand typically communicate without friction.
Check your camera’s specifications first. Look for which smart home platforms it supports. Common ecosystems include major tech companies that offer both cameras and lighting solutions. Your lights should support the same ecosystem. This compatibility ensures devices can “talk” to each other through automation rules.
A hub becomes essential when mixing devices. Even within one ecosystem, a central hub strengthens the connection. The hub acts as the brain of your system. It processes signals from your camera and sends commands to your lights. Without a hub, some automations may not work reliably.
Research the communication protocols your devices use. Some systems rely on Wi-Fi, while others use different wireless standards. Your hub must support the same protocols as both your lights and cameras. This technical match prevents connection failures later.
Read product documentation carefully. Manufacturers list compatible devices in their guides. Check online forums where users share real experiences with specific combinations. This helps you avoid purchasing devices that seem compatible but actually conflict.
Test compatibility before full commitment. Buy one light and one camera first. Set them up together in your home. Verify they connect through your hub and respond to basic commands. This small test prevents expensive mistakes.
Consider your future expansion plans too. Will you add more cameras or lights later? Choose an ecosystem with a strong product lineup. This flexibility lets your system grow without replacing everything.
Setting Up Your Smart Home Hub for Centralized Control
Your smart home hub is the brain of your entire system. It receives signals from your security cameras and sends commands to your smart lights. Without it, your devices cannot talk to each other.
Start by choosing a hub that supports your camera and light brands. Most hubs connect through WiFi or a dedicated wireless frequency. Check the hub’s specifications to confirm it works with your devices. Some hubs require a subscription for advanced features, while others do not.
Install the hub in a central location in your home. This placement ensures strong signal strength to all your devices. Keep the hub away from thick walls or metal objects that block wireless signals. A hallway or living room often works best.
Download the hub’s mobile app on your smartphone. Create an account and follow the setup wizard. The app guides you through connecting your WiFi network and adding devices. Take your time with each step to avoid connection problems later.
Add your security cameras to the hub first. Follow the pairing instructions in your app. Your camera should appear in the device list once connected. Repeat this process for each smart light you own.
Test the connection by opening your app and checking if all devices appear online. Green indicators typically mean your devices connected successfully. Red or gray indicators signal connection issues that need fixing.
Once your hub recognizes all devices, you can create automation rules. Your hub stores these rules and executes them automatically. This setup eliminates the need to control lights and cameras manually every single time.
Step-by-Step Guide to Creating Motion-Triggered Lighting Automations
Motion triggered lighting automations work by connecting your camera’s motion sensor to your smart lights through your hub. When the camera detects movement, it sends a signal to the hub. The hub then instantly commands your lights to turn on.
Start by opening your smart home app. Find the automation or routine section. Create a new automation and select “camera motion detection” as your trigger. This tells the system what event should start the action.
Next, choose which lights you want to control. You can select individual lights or group them together. For example, you might want porch lights and entryway lights to activate together. This creates a coordinated security response.
Set your light brightness level. Most systems let you choose full brightness or a dimmed setting. Many people prefer full brightness for security purposes. This makes intruders clearly visible and deters suspicious activity.
Add a time delay for the lights to turn off. Most automations let you specify how long lights stay on after motion stops. Common settings range from 30 seconds to 5 minutes. Choose what works best for your situation.
Test your automation by walking in front of your camera. Watch if the lights respond correctly and turn on at the right brightness. If nothing happens, check that all devices are online in your app.
Create multiple automations for different areas. Your front porch might need different settings than your backyard. You can also set automations for specific times of day. For instance, motion at night might trigger brighter lights than motion during daytime.
Save your automations and monitor them for a week. Adjust timing and brightness as needed based on real world performance.
Testing and Fine-Tuning Your Automation Sequences
Testing your automation sequences ensures everything works as intended before you rely on your system for security. Start by running simple tests in real conditions rather than just checking settings on your app.
Walk in front of your camera during daytime first. Watch if the lights turn on at the expected brightness level. Note any delays between motion detection and light activation. Most systems have a slight lag of one to three seconds, which is normal.
Test during different times of day. Motion detection performs differently in bright sunlight versus evening darkness. Your camera’s sensitivity settings might need adjustment based on lighting conditions. Run the same test at dawn, midday, and dusk to confirm consistent performance.
Check your automation rules one more time. Verify that lights turn off after the correct duration. If you set lights to stay on for five minutes, time it to confirm accuracy. Adjust the timer if the lights stay on too long or shut off too quickly.
Test each automation separately before running them all together. This helps you identify which rule causes problems if something goes wrong. Once individual automations work correctly, run multiple sequences together to check for conflicts.
Document your test results. Write down what worked and what needs adjustment. This record helps you troubleshoot issues later.
Finally, ask family members to test the system too. They might trigger automations differently than you do. Their feedback reveals blind spots in your setup.
After successful testing, monitor your automations for one full week. Track any failures or unexpected behavior. Make small adjustments as needed. This careful approach builds confidence in your security system.
Best Practices for Reliable Automated Security Lighting
Reliable automated security lighting depends on a few key principles. Start simple and build complexity over time. Most people fail by creating too many rules at once. Begin with basic triggers like motion detection or sunset activation. This approach helps you understand how your system behaves before adding advanced features.
Consistency matters more than complexity. Use the same brand ecosystem for your cameras and lights whenever possible. Different manufacturers sometimes struggle to communicate smoothly. A unified system responds faster and more reliably when motion occurs.
Your hub placement affects performance significantly. Position it centrally in your home, away from metal objects and thick walls. This location ensures strong communication between your hub, cameras, and lights. A weak connection causes delayed responses or missed triggers.
Test each automation rule individually before combining them. Walk in front of your camera during different times of day. Check if lights activate at the correct brightness level and turn off on schedule. Document what works and what needs adjustment.
Set appropriate timing for light activation. Lights should turn on instantly when motion is detected, but turn off after a reasonable delay. Most systems work best with 5 to 10 minute off delays. This prevents lights from flickering if someone moves in and out of the camera’s view.
Monitor your automations for at least one full week after setup. Track which rules trigger correctly and which ones fail. Adjust sensitivity settings if your camera misses motion or triggers too frequently.
Regular maintenance keeps your system reliable. Check that all devices remain connected to your hub. Update your app and firmware when new versions become available. These simple practices prevent unexpected failures when you need security lighting most.
Common Mistakes That Break Camera-Light Integrations
Many people make simple mistakes that prevent their camera and light systems from working together. Understanding these errors helps you avoid frustration and keep your security system reliable.
The most common mistake is mixing devices from different ecosystems. Your camera, lights, and hub must communicate using the same language or protocol. If you buy a camera from one brand and lights from another without checking compatibility, they simply won’t talk to each other. Always verify that all devices work within the same ecosystem before purchasing.
Skipping the hub setup is another frequent error. Some people think they can connect cameras directly to lights through an app alone. A hub acts as a translator between your devices. Without it, your automation options become very limited. The hub centralizes control and enables all your devices to coordinate properly.
Overcomplicating your first automations causes many integration failures. New users often create 10 automations at once with complex timing rules. Start with one simple automation instead. Test it thoroughly before adding more. This approach helps you spot problems quickly.
Inadequate testing before relying on your system is dangerous. People set up automations and assume they work perfectly. Then they discover problems during an actual security event. Walk in front of your camera at different times. Check if lights respond correctly. Test during daytime and nighttime. Verify that lights turn on and off at the right times.
Finally, poor hub placement reduces system performance. Your hub needs a clear signal path to all devices. Position it centrally in your home, away from metal objects and thick walls. This ensures reliable communication between your camera and lights.
Troubleshooting Automation Failures and Connectivity Issues
When your smart lights and security cameras stop working together, start by checking your internet connection first. A weak WiFi signal often breaks automation sequences. Move closer to your router and test again.
Verify that your hub has power and shows a green light. A disconnected hub stops all automations instantly. Restart your hub by unplugging it for 30 seconds, then plug it back in.
Check if your devices still appear online in your app. Sometimes cameras or lights disconnect from your network without warning. Open your smart home app and look for any offline device notifications. Reconnect any offline devices to your WiFi network.
Review your automation rules in the app settings. A single typo or incorrect time setting breaks the entire sequence. Open each automation and confirm the trigger (motion detection) matches your camera model.
Test one automation at a time instead of running all sequences together. Isolate which rule actually failed. This helps you pinpoint the exact problem quickly.
Restart your camera and lights individually. Many connectivity issues resolve after a simple restart. Unplug each device for 20 seconds, then reconnect.
Check your app for any pending updates. Outdated software causes compatibility problems between devices. Update your smart home app and all connected device apps.
If problems persist, reset your hub to factory settings and set up your automations again from scratch. This removes corrupted settings that cause failures. Before resetting, write down all your automation rules so you can recreate them.
Contact your hub manufacturer if issues continue after these steps. They can check for network conflicts or device incompatibilities affecting your system.
Final Thoughts
Setting up smart lights with security cameras makes your home safer and smarter. You do not need advanced tech skills to get this right.
Start with a simple plan. Pick devices from one ecosystem. This choice prevents most connection headaches later.
Your hub acts as the brain of your system. It connects your cameras and lights so they can talk to each other. Without it, automation becomes very hard.
Build your automations step by step. Begin with basic rules like turning lights on when motion happens. Add more features once these work well.
Testing is not optional. Check every automation before you trust it fully. A quick test now saves stress later.
Remember that patience pays off here. Smart home systems need small adjustments over time. Do not expect perfection on day one.
Keep your devices updated regularly. App updates often fix bugs and improve performance. This small habit keeps your system running smoothly.
If something breaks, go back to basics. Check power, connections, and app settings first. Most problems have simple fixes.
Your security system should feel like a helpful partner. Lights turning on at the right time can scare off unwanted visitors. Cameras give you eyes even when you are away.
Think of this setup as an ongoing project, not a one time task. Small improvements over time create a stronger system.
With the right hub, matched devices, and clear automation rules, your home becomes safer and smarter every day. Consistency and simple planning make all the difference in the long run.
Frequently Asked Questions
Can lights respond to camera motion detection?
Yes, your lights can turn on automatically when cameras detect motion. You program this through your smart home app by creating automation rules. The camera sends a signal to your hub, which then commands the lights to activate. This works best when all devices connect through the same ecosystem.
Do all my devices need to be from the same brand?
It’s highly recommended. Devices from the same brand communicate more reliably with each other. When you mix brands, compatibility issues often occur. Your hub may not recognize commands from mismatched devices. Starting with one ecosystem makes setup much simpler and more dependable.
What role does a hub play in this integration?
Your hub acts as the central brain of your system. It receives signals from cameras and sends commands to lights. Without a hub, devices struggle to communicate with each other. The hub also enables you to create complex automations that involve multiple devices working together seamlessly.
Why should I test my automations before relying on them?
Testing reveals problems before you actually need your system. You might discover that lights don’t turn on as expected or timing feels off. Testing lets you adjust settings and fix issues in advance. This ensures your security system works perfectly when motion is detected at night or when you’re away.
What’s the best first automation to set up?
Start simple with motion detection triggering outdoor lights. Program lights to turn on when your camera detects movement on your porch. This basic setup teaches you how automations work. Once you master this, you can add more complex rules involving multiple cameras and lights.